Saturday, November 19, 2011

Image processing

Motivation

The last couple of days I have been working in a set of utilities for manipulating images. I have done functions for read, write, modify and view them. I have worked with PPM images [1]. I know they are too expensive, but also have a very easy syntax.

I started working with this because a partner told me about how to encrypt an image and give it to two folks, while no one can know the original image, but together can solve it.

I don't know if having control over PPM images is useful for someone else. I'm thinking about if it has worth to upload this work to Hackage [2]. I saw a couple of packages about the same issue, but I actually don't like none of them.

PPM as data

First at all, we need a data structure where store our PPM images. In a first try, I decided to use an Array [3] of RGB values. I changed my idea when I realize that modifying an Array is expensive (maybe, I am wrong here, can somebody confirm it?). A mutable array [4] was not an option, because I wanted to keep pure my code. Then, I shifted to Map [5]. Actually, this was a bit arbitrary, but after testing it, I moved again to IntMap [6]. IntMap is far more efficient than Map, and make unions very fast! Then, I decided to use unions for operations between PPM images, and the current implementation is built on top of an IntMap.

I wanted to make a simple interface, so my basic operations were:

getPixelUnsafe :: PPM -> Int -> Int -> RGB
putPixelUnsafe :: PPM -> Int -> Int -> RGB -> PPM

With this couple of functions it might be easy to implement almost every functionality we want to have, keeping the PPM type absctract. Anyway, I will sometimes re-use methods of the IntMap to make the library faster. I tagged these functions as "unsafe", because if the coordinates of the requested pixel are out of range of the PPM image, they will cause problems. We will use them only in contexts where we are sure that the coordinates are valid.

So, the first and base library provides a pure interface for create and manipulate PPM images, and a pair parser/render of PPM images. As an example:

createPPM :: Int -> Int -> RGB -> PPM

?> renderFilePPM "black.ppm" $ createPPM 100 100 0

This call creates a black 100x100 PPM image. As you can see, RGB values are an instance of Num. In the example, fromInteger 0 = RGB 0 0 0. Moreover, abs acts like id, negate calculates the inverse color and signum turns a color into the grayscale.

PPM image viewer

The next tool I created was a PPM image viewer. I used GTK [7] to create the GUI. This step was very easy. After parsing a file, we just get the RGB value in each pixel and, using Cairo [8], print it in a drawing area. The code of the renderer is short so I will post it here:

module PPMViewer.Render (
 ppmRender
 ) where


import Graphics.Rendering.Cairo
import Codec.Image.PPM


ppmRender :: PPM -> Render ()
ppmRender ppm = do
 let w = getWidth ppm
     h = getHeight ppm
 sequence_
  [ do let rgb = getPixelUnsafe ppm x y
           r   = fromIntegral (rgbRed   rgb) / 255
           g   = fromIntegral (rgbGreen rgb) / 255
           b   = fromIntegral (rgbBlue  rgb) / 255
       setSourceRGB r g b
       rectangle (fromIntegral x) (fromIntegral y) 1 1
       stroke
    | x <- [ 1 .. w ] , y <- [ 1 .. h ] ]


I felt a bit odd using rectangles to print pixels. Is there another option? I don't know too much about Cairo, so if anyone knows a better implementation, I will be very glad to know it.

PPM image converter

Yes, we now have an interface that in theory can create any image, but creating a whole image pixel by pixel is non-viable! This is why I created the next tool: a PPM image converter from other formats (PNG, JPG, whatever). I used here again GTK, and since it has functions that read image files and turn them to Pixbufs, my solution was to create a function that transform a Pixbuf into a PPM data. Here is the code:

module PPMConverter.Pixbuf (
 pixbufPPM
 ) where


import Graphics.UI.Gtk
import Data.Array.MArray (readArray)
import Codec.Image.PPM
import Codec.Image.PPM.Internal
import Control.Applicative
import Data.Word (Word8)
import qualified Data.IntMap as Map


pixbufPPM :: Pixbuf -> IO PPM
pixbufPPM pb = do
 n <- pixbufGetNChannels pb
 w <- pixbufGetWidth     pb
 h <- pixbufGetHeight    pb
 r <- pixbufGetRowstride pb
 arr <- (pixbufGetPixels pb :: IO (PixbufData Int Word8))
 let xs :: [IO (Int,RGB)]
     xs = [ do let getp :: Int -> IO Int
                   getp = fmap fromIntegral . readArray arr
               r <- getp p
               g <- getp $ p + 1
               b <- getp $ p + 2
               return (pixelToInt w x y , RGB r g b)
                 | x <- [ 1 .. w ]
                 , y <- [ 1 .. h ]
                 , let p = (y-1) * r + (x-1) * n ]
 a <- foldl (\r x -> liftA2 (uncurry Map.insert) x r) (pure Map.empty) xs
 return $ PPM w h a


I guess this admits a lot of improvements. Indeed, I getting space problems with this function for big images.

The encryption algorithm

Now, let's see a working example of these tools: the encryption algorithm motivated by the problem introduced at the beginning of this text. As a first step, we convert a PNG file with the PPM converter:

Left: the original PNG image. Right: the PPM image output.

Albatross are so cute! Well... now we save the file wherever you want. We can see it with the PPM viewer:

The PPM Viewer

It's time to encrypt this image. The first step is to create a random image of the same size of the original. Then, sum pixel by pixel and coordinate by coordinate (module 255) both images. The random and sum images form the two pieces of the puzzle. If we subtract one from the another we will get the original image!

But, what happens if we do the operation backwards?


Scary! But we have obtained the negative of the original image.

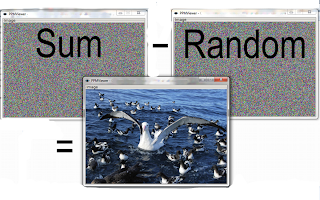
Operations between pixels are of trivial implementation using this library. And are very fast because they use union of IntMap, which are indeed very fast!

Conclusion

This is a sample of images (PPM here) implemented in Haskell. It was an interesting (and funny) exercise for me. If you are interested in have this functionality available publicy, make me know it.

Thanks for read,
Daniel Díaz.

References

[1] The PPM image format: http://netpbm.sourceforge.net/doc/ppm.html
[2] Hackage: http://hackage.haskell.org
[3] Arrays: http://www.haskell.org/ghc/docs/latest/html/libraries/array-0.3.0.3/Data-Array.html
[4] Mutable arrays: http://www.haskell.org/ghc/docs/latest/html/libraries/array-0.3.0.3/Data-Array-MArray.html
[5] Maps: http://www.haskell.org/ghc/docs/latest/html/libraries/containers-0.4.1.0/Data-Map.html
[6] IntMaps: http://www.haskell.org/ghc/docs/latest/html/libraries/containers-0.4.1.0/Data-IntMap.html
[7] GTK library: http://hackage.haskell.org/package/gtk
[8] Cairo library: http://hackage.haskell.org/package/cairo

Monday, November 7, 2011

HATEX pragma

Before start growing the HaTeX project with more features and modules, I decided to add a new feature: the HATEX pragma.

What problem this solves?

This pragma will save of modifying HaTeX-meta each time a new module is added or deleted from HaTeX. Until today, HaTeX-meta had a fix list of modules that it will process to generate the analogous .Monad modules, and each time a module is added or deleted from HaTeX, you needed to add (or delete) its module name in the HaTeX-meta code. I saw this too short-sighted, so I made a change.

How it is solved?

The solution was to order to HaTeX-meta to search HaTeX modules which have the MakeMonadic option in a HATEX pragma. This pragma looks like this:

{-# OPTIONS_HATEX MakeMonadic #-}

HaTeX-meta follows the next steps:
  1. Parse the HaTeX.cabal package description.
  2. Look for the exposed modules.
  3. Parse all modules and filter those with the MakeMonadic option enabled.
  4. Process them to create the .Monad modules, skipping the MakeMonadic option in the output (so in the next run of HaTeX-meta it will not process a .Monad module).
See the code of HaTeX-meta here.

Conclusion

I hope this will make easier future changes in HaTeX and avoid updates of HaTeX-meta with changes not directly related with it. Also, I think this will be handy to developers interested in add a new module to HaTeX to, for example, implement some new LaTeX package.
 
Thanks for read,
Daniel Díaz.

Thursday, October 6, 2011

HaTeX 3 - First release

Wow! I finally do the first release to Hackage of HaTeX 3:

http://hackage.haskell.org/package/HaTeX-3.0.0

You can try it with the next example!


{-# LANGUAGE OverloadedStrings #-}

import Text.LaTeX.Base.Monad

main :: IO ()
main = do
 l <- execLaTeXT example
 renderFile "Example.tex" l


example :: Monad m => LaTeXT_ m
example = do
 documentclass [] article

 document exampleBody


exampleBody :: Monad m => LaTeXT_ m
exampleBody = do
 "This is an example of how "
 hatex3
 " works, printing a table of "
 "the thirteen first elements of the "
 "Fibonacci sequence."
 bigskip
 center $ underline $ textbf "Fibonacci table"
 center $ tabular Nothing [RightColumn,VerticalLine,LeftColumn] $ do
   textbf "Fibonacci number" & textbf "Value"

   lnbk
   hline
   foldr (\n l -> do fromString (show n) & fromString (show $ fib n)
                     lnbk
                     l ) (return ()) [0..12]


fibs :: [Int]
fibs = 1 : 1 : zipWith (+) fibs (tail fibs)


fib :: Int -> Int
fib = (fibs!!)

This example builds a table with the thirteen first elements of the Fibonacci sequence.

I'm writing a manual for the library, but it will take me some time (and time is sometimes hard to find).

Until the next time!
Daniel Díaz.

Saturday, October 1, 2011

HaTeX 3 - Two styles

Since the last post about this topic (previous notes), I worked on HaTeX 3 and it is almost ended. This post will response a question about the "Applicative vs Monadic" section of the last post.

Example over HaTeX 2

Let be the next simple example (it works with HaTeX 2):

{-# LANGUAGE OverloadedStrings #-}

example :: Monad m => LaTeX m
example = do
  documentclass [] article
  author "Daniel Díaz"
  title "Example"
  document $ do maketitle
                "Hello, world!"

Here, expressions like documentclass [] article and title "Example" have type Monad m => LaTeX m, where LaTeX is a monad transformer. Thus, they are actions over a monad and we can put all of them in a do sequence. Each action, appends in the state of the LaTeX monad a piece of LaTeX code. For instance, for title "Example" it appends the code \title{Example}.

Working with HaTeX 3: First style

As I mentioned in the last post, there is a new datatype LaTeX describing the LaTeX syntax. LaTeX combinators (like author an title) still exist, but now you can use them in two different ways. What I meant with applicative style is to use these combinators without the presence of any monad. You create an expression of type LaTeX, and you combine them with the monoid operator (<>), alias of the mappend method (See the Data.Monoid module).

Let's write the example this way:

{-# LANGUAGE OverloadedStrings #-}

example :: LaTeX
example =
    documentclass [] article
 <> author "Daniel Díaz"
 <> title "Example"
 <> document (maketitle
           <> "Hello, world!")

Yes, all these operators seem ugly. Even I was forced to write an extra parentheses. But I like you can do all the work without monads.

Working with HaTeX 3: Second style

Now, we are interested in take back the do notation. But we don't want to do every work twice. Indeed, if we did this work manually, we would have to define all entities (including commenting, type signature and exposing in the export list) twice! That's really bad!

The solution was HaTeX-meta. HaTeX-meta is a program that reads a subset of the HaTeX modules (those that define LaTeX combinators) and generates automatically an analogous module that export the combinators with monadic types. And preserving their documentation! These modules have the same module name, but followed by .Monad, and import their originals no-monadic functions to build the new monadic ones.

So, now you can write LaTeX code with HaTeX using do notation with the new type-system. The example above stay almost equal if you import the monadic modules of HaTeX 3:

{-# LANGUAGE OverloadedStrings #-}

example :: Monad m => LaTeXT_ m
example = do
  documentclass [] article
  author "Daniel Díaz"
  title "Example"
  document $ do maketitle
                "Hello, world!"


Closure

I hope this was understandable enough. For now, this is all about HaTeX 3. Next posts will be about HaTeX-meta and HaTeX 3 release notes. The official release will be soon, but the code will be available before.

Thanks for read,
Daniel Díaz.

Wednesday, September 14, 2011

HaTeX 3 - Previous notes

As I announced in my provisional webpage (here), I'm preparing a completly new version of HaTeX. It will be the third version. Firstly, I wanted to write some lines about what was, is and will be HaTeX. So here we are.

A bit of history

When I started to write this library, I didn't know too much about LaTeX. I thought: "Well, I want to get LaTeX results, but using Haskell instead of LaTeX". That was my first thinking. But quickly I found other utilities. Mainly, I started to write outputs of my own programs directly in a LaTeX document, or tables contrasting the time employed by different programs solving the same task.

When I did the first upload (it actually was my first upload to Hackage), the way the library worked was storing raw LaTeX code in the state of a writer monad transformer applied to IO. So, when you type author "Daniel Díaz", it appends "\author{Daniel Díaz}" at the end of the state. Thus, HaTeX was really a high-level way to append strings that ought contain LaTeX code. But the library was putting all those backslashes and braces for you!

In the second version, we said goodbye to the IO monad. The monad transformer now becomes free to be composable with the monad of your desire. This was thanks to Alexey Khudyakov, who gave me a very neat feedback and this change as a proposal.

The new datatype

However, I never liked that the LaTeX type was only a type synonym of the Writer monad with a difference string as state. And this is the main point I wanted to change. In HaTeX 3, I defined a datatype representing the LaTeX syntax, so author "Daniel Díaz", now means:

TeXComm "author" [FixArg (TeXRaw "Daniel Díaz")]

Far harder to read! But, if you take a look on it, it is only describing the syntax of that LaTeX expression. You can say that this is the abstract syntax of that expression. And I feel more comfortable working with this datatype. After you have built your LaTeX document, just use the render function to build your final code in the form of a value in the Text type. This also make possible to build a LaTeX parser (I guess I will write one some day).

Following this line, I have also restricted the input of functions to values of a type that make sense with that function. For instance, making a LaTeX tabular, you must to specify how columns are aligned and where to put vertical lines to divide them. Thus, the tabular function have an argument of type [TableSpec], being TableSpec a datatype containing the possible specifications for your table, so you can't put invalid data.

A new module hierarchy

While Text.LaTeX is still the main module, it forks in two submodules: Text.LaTeX.Base and Text.LaTeX.Packages. The former contains all commands and environments that you have without importing others with the usepackage command. The latter have a submodule per LaTeX package. Well, only a few of them are implemented! But you can always request one, or, much better, you can contribute implementing one! The aim of this breakup is to give you the freedom to import only the functions you want without a too big import header. Also, I thought this will help to do code better organized.

Applicative vs Monadic

Maybe, you realized that the author function no longer communicates with any kind of writer monad. In fact, it takes an author's name, and return something of the datatype LaTeX. No monad involved. LaTeX is instance of the Monoid class, so you can append these results with mappend (<>) in order to obtain your final output.

This will involve to repeat many times this operator. We can save this work by the same way we do that the last time: making use of the writer monad. But I have not written, at the moment, any monadic code. My idea is to use some program to, from the source code of a module with these applicative style functions, generate a module with monadic style functions. For instance, if we have:

author :: LaTeX -> LaTeX
author a = TeXComm "author" [FixArg a]


We can write:

author :: Monad m => LaTeX -> LaTeXM m ()
author = tell . App.author

End of this preview

And, for now, this is all I have to say about HaTeX 3. As always, you can do any pre-release suggestion, or discuss about the current course of the library, as it was described here. Finally, I want to apologize for so unstable library. I am only trying to make it better as possible.

Thanks for read,
Daniel Díaz.

Tuesday, March 22, 2011

On Windows: How to install GTK

Sometimes, we look for provide a graphic interface to our programs, and, after analyze various options, we decide to use gtk. However, type cabal install gtk will not be enough to have installed the library. As various problems can arise during the installation, I decided to write this little step-to-step guide available for everyone interested.

Step 1 - Getting GTK

First, download the all-in-one bundle of gtk. At the moment of this writing, the version you need is 2.16, but it may change in the future. You will get a compressed file. Decompress it in a path without spaces (for instance: .../gtk), and add to your PATH environment variable the directory .../gtk/bin. You will need this directory in your PATH not only for the installation, but also for executing your gtk-based programs. Otherwise, you will need to copy all DLL's needed for your program in the folder where it is running.
I don't know why, but spaces will do your installation fail. Official documentation alerts of this. What surprised me was that the pkg-config (and all others in the gtk binaries directory) command still works, despite of the spaces. This should not confuse you.

Step 2 - MinGW

Search in your Haskell Platform folder the directory mingw/bin, and add it to your PATH environment variable. I think this step is only necessary for the installation, although I can not confirm it yet.

Step 3 - Build tools

The gtk package can not be installed directly, it needs another package to be installed first, and cabal-install is not able to figure that it is necessary. So, before the gtk package, we install the gtk2hs-buildtools package:

> cabal install gtk2hs-buildtools

Step 4 - Install GTK

And finally, we are ready to install gtk in the traditional way:

> cabal install gtk

It will take a large time. At least, it will take it for me.

Haskell Platform and gtk

Currently, there is a bug that prevents you to install gtk on the version 2011.2.0.0 of the Haskell Platform. You must use an older version of the platform (2010.2.0.0 works).

Reporting problems

While using gtk you may found problems, bugs or, perhaps, you have a request for a new feature in the package. For these purposes, visit the Gtk2Hs bug tracker.

Final notes

Another guides on this topic can be found at:
I tried to merge everything I have read, and my own experience, filtering the necessary information to get gtk working. I hope it helps.

New notes (June 06, 2011)

I've tested the gtk installation with the Haskell Platform 2011.2.0.1 and it throws the same error (while cabal install gtk):

Registering glib-0.12.0(cairo-0.12.0)...
setup.exe: internal error: unexpected package db stack: [UserPackageDB]


Monday, March 21, 2011

Blog created

I have decided to create a blog where write my own experiences and thoughts.

As soon as I have any idea, I will post it here, without excesive rigor. This will help me to arrange ideas and share them.

This blog will focus mainly on functional programming with Haskell, although it may arise also some mathematical threads.

For all those who read me, welcome!